I am painting the inside of the compartments and the inside of their tops before I glue the tops in place permanently. Time will tell whether this is a good idea or not. My reasoning is that it is easier to do the painting while access is good (once the tops are in place access is via hatches and painting would be difficult). The downside of this approach is that the painted parts have to be glued together and the squeezed out epoxy will make a mess on the paintwork. So its a trade-off, difficult painting for several coats of paint versus one lot of clean up after gluing.
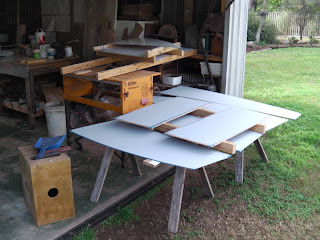
Here are some photos of the process. First photo shows the seat tops in the foreground with their grey primer and the fore and aft compartment tops in the background with their gloss white finish coat. Just visible on the seat tops is the blue masking tape around the edges; there is also tape under the paint masking the glue lines where the supporting beams are.
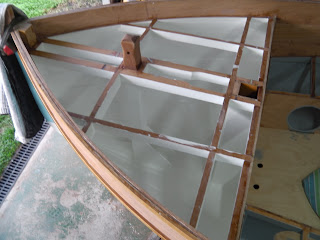
Here is the forward compartment with its final coat of paint. That is 3 coats of primer, 2 undercoats and 2 finish coats. All the paint is International boat paint, it isn't cheap but it produces a good finish and I like it. I expect that the paint inside these compartments will last for a very long time, long enough that I don't have to repaint it, so the time and expense involved are worthwhile.
Here is a shot of the rest of the boat, primer in the seat compartments and finish coat in the stern. The vent pipe for the starboard ballast tank is visible to the side of the centreboard case.
While I was painting the inside of the decks I wondered, more than once, how well the masking tape would work. Would it keep the paint off the gluelines or would I have paint creeping under the edges of the tape? Would it come off cleanly without pulling paint away? Here is a photo of the foredeck with the tape removed; there was no paint under the tape at all and the tape pulled off cleanly without taking any paint with it. This, to me, is a good recommendation for the tape (3M blue tape number 2080EL, $16 per roll! but it works) and the paint which sticks to itself and the underlying plywood very well).
Here is a pic of the bench with its collections of tins of paint and solvent. I started the painting using brushes and then experimented with a small foam roller 150 mm long and about 30mm diameter, it is the white phallic symbol. The roller has a rounded end and this works very well to wipe or smear paint into corners and areas that are too small for the roller to fit. It works very well for spreading the paint around quickly and copes with the plank overlaps very well. I use a brush for the really awkward places but the roller does the job for primer and undercoat in half the time. I put the finishing coats on with a brush and try to tip it all off in the same direction which can be tricky inside those compartments. The foam roller covers are cheap and I toss them rather than trying to reuse them. I use decent brushes and keep them clean for reuse.
I'm building a boat to a design by Paul Fisher of Selway Fisher Design in the UK. The design is called "Able" and her vital statistics are: overall length 4.88m (16ft), beam 2m (6ft 6in) and design weight is 360kg (790lbs). You can read more about this design at http://www.selway-fisher.com/OtherDB.htm#KANE.
I intend to procede more slowly with this boat than I did with either of my other boat building projects (see links below on the right). This is, after all, a hobby and there are other things to do. So, updates to this blog might happen once every week or two. Come back and see.
If you would like to contact me please Click to Send me Email


No comments:
Post a Comment