
Tuesday, 11 September 2012
Gone Sailing!
There won't be any boatbuilding for a while because I am going sailing on a friend's Mottle 33. Here is a photo of the boat in her home marina (with the blue sail cover).

4th Pair of Planks
Added the second of the 4th pair of planks this morning. This means that half the planking is done! Here are some photos; first is the plank I glued on yesterday morning.

Next, this is the plank I glued this morning. There are about 40 of those plywood "hairpin and wedge" clamps, one every 100 to 125 mm.

A view from the aft quarter. It is hard to get a good picture from inside the shed. I need a bigger shed before the next boat!

And from in front. I don't understand the cause of the "haloes" except that the sun was shining towards the camera from my right.

Friday, 7 September 2012
3rd Pair of Planks and Bilge Runners
Since the last post I have been sailing for a couple of days. I took my Navigator (see link on left) to a Wooden Boat Association messabout at Caloundra - 2 glorious days of sunshine and wind!
More to the point here, I finished the outer parts of the keel. The doublers on either side of the centreboard case were glued in place. The capping strips to cover the edge of the ply were shaped and fitted into housings routed out of the outer keel and skeg. When the glued had set the bottom of the keel, from stem to transom, was cleaned up with hand planes. As I expected, this was hard work because it involved reaching out over the first 2 planks.
The 3rd pair of planks were test fitted, trimmed where needed and glued in place, one yesterday and the other today.
The bilge runners fit on the edge of the 3rd plank and have to be laminated in place to suit the curve of the hull. I worked out where to put them, covered the hull with plastic so they don't stick to it, glued them up (4 pieces 42 x 12 mm) and clamped them in place. Here is a photo:

After the glue has set I will remove the bilge runner, clean the glue off and taper the ends before gluing and screwing it permanently to the hull.
Behind the bilge runner is the cleaned up keel. Click on the photo to enlarge it and you can see the ply doublers along the centreboard case and the capping strips.
Roger, who is about to start on building and Able, asked how I had faired the centreboard case into the forward keel and skeg. Here are a couple of photos show this transition, first from above and second from the side.
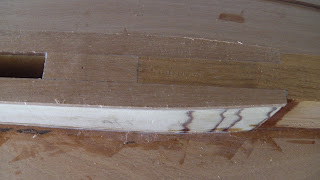
The view from above. The ply doublers on the sides of the centreboard case extend over the skeg by about 150mm and are covered by a hardwood strip that is let into a rebate cut in the skeg. The end of the case log is covered by a short piece of the same hardwood. the doublers and the cover strip are tapered off to a blunt end that I will fill with an epoxy fillet.
Here is a closeup view from the side.

Subscribe to:
Comments (Atom)