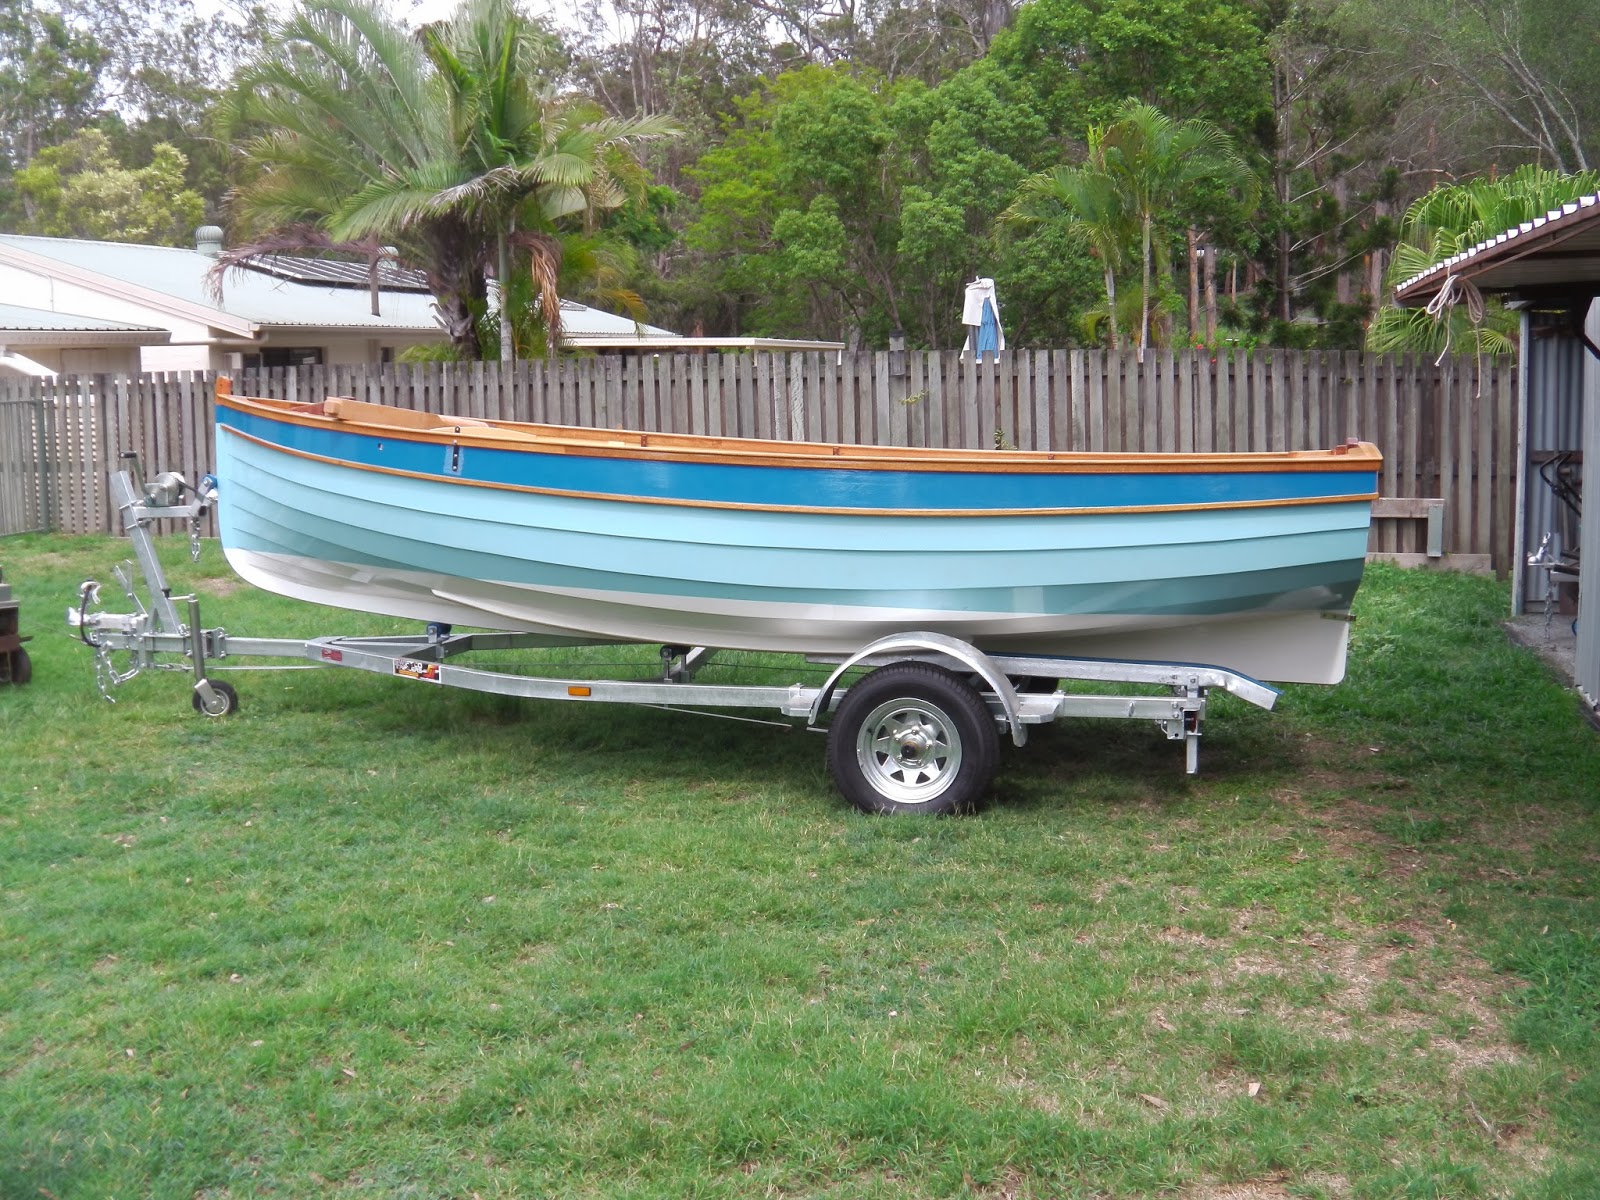
I'm building a boat to a design by Paul Fisher of Selway Fisher Design in the UK. The design is called "Able" and her vital statistics are: overall length 4.88m (16ft), beam 2m (6ft 6in) and design weight is 360kg (790lbs). You can read more about this design at http://www.selway-fisher.com/OtherDB.htm#KANE.

I intend to procede more slowly with this boat than I did with either of my other boat building projects (see links below on the right). This is, after all, a hobby and there are other things to do. So, updates to this blog might happen once every week or two. Come back and see.

If you would like to contact me please Click to Send me Email

Saturday, 22 February 2014

Finding Mistakes

Over the past few days I have found a few mistakes of the "that won't work very well like that". It's a bit like painting yourself into a corner. I mounted the rudder and was reminded of a mistake I fixed a while ago. Here's a photo of the rudder on the boat. My hinges work well although it was a struggle to get them properly in line so the long hinge pin could easily be put in and taken out.

 
Next photo shows the problem I found when trial mounting the rudder. The trim strips across the transom stuck out far enough to seriously reduce the rudder movement. I cut them back to provide enough clearance.

 
I fitted the "pot lid" hatches to the fore and aft bulkheads. Here is a photo of the aft one. It will work well and the neoprene sealing strip will keep it watertight. My planned turn button clips to hold the hatch closed will work but not as well as I had hoped. I am rethinking how to keep the hatches shut and pressed against their sealing strips.
 
The photo also shows another mistake. It might be hard to see but the hatch sticks out about 10 or 11 mm in front of the bulkhead, just far enough to prevent the floor panels from lifting! I will have to cut a notch in the edge of the floor panel. Easy enough to do but then all the primer, undercoat a topcoat has to be redone. Alternately, I can just accept that the hatch cover has to be removed before the floor can be lifted.

 
Here are the two forward hatches. The blue tape labels are so I don't mix them up - they arent't interchangeable! Another mistake, the pins stick down and stop the hatches opening easily! I will shorten the pins a little but they will still be in the way.

 
Next photo shows the inside of one of the hatches with the two lugs that hold one edge in and the neoprene strip in place. Even putting the neoprene strip in provided an opportunity for a mistake! I put the strip hard in the corner between the two layers of ply. When I tried the hatch it would not close and eventually I realised the strip, in the corner had nowhere to go on one side so didn't compress as easily. Moving the strip out a couple of mm from the corner fixed this.
 
Now I just have to work out how to hold the other edge.


Monday, 17 February 2014

Bits and Pieces

Its been a while since my last post and some of you might be thinking that I have been doing other things. Far from it, I have been working on the boat most days but most things now fall into the "bits and pieces" category. I have a long list of small jobs and am slowly working my way through them. As I do this and remove items from the list I seem to add new ones! I guess this is inevitable as the end of a big project gets close.

As well as the following items I have been painting various small items. This takes time, even in our current hot weather I can only manage one coat a day! No photos of this because it is too boring!

I went out with the camera today and took some photos of various bits and pieces.

Here is one of the chain plates with the shroud attached with two shackles that add up to the right length. This looks untidy to me and I will organise something better. Even a simple cord lacing would look better than two shackles! Making the slot down through the gunwale was a challenge (the slot is 25 x 2.5 mm through about 60 mm of hardwood. I managed to cut two of them without damaging the paintwork.


The pinrail and pins took a while. The rail is curved and bolted through the bulkhead and frame work behind. Turning the pins was an interesting exercise - I sold my wood turning lathe and tools so made these pins on a metal turning lathe using an old screwdriver as a tool! Not the best arrangement but it seemed to come out OK.
 
 
The centreboard lifting tackle was straightforward except that the bullseye where the case top slopes down needed to be packed up a bit to compensate for the packing under the turning block where the wire changes direction. The 6:1 tackles will raise the board fairly easily I think - I can't move it very far with the boat on the trailer but it is easy to move a short distance. The padeye on the bulkhead will also serve as the fixed end point for the boom vang and the mainsail clew downhaul.
 
 
The "pot lid" hatches in the fore and aft bulkheads need to be secured with some sort of turn button catch on the outside and lugs on the inside. There are 3 of these hatches so 6 turn buttons and 6 lugs had to be made. They are simple enough but making multiple small wooden pieces is a pain in the ......
 
Here is a photo of a turn button catch on a test setup. The turn button is held in place here by a hex head bolt, I will use a nicer looking bolt in the finished job. There is a big washer between the turn button and the paintwork on the ply bulkhead.
 

Here is the turn button in its turned position. next to it are some more of the flock that I made.


Lastly, a profile of the turn button. The sloping relief under the sticky-out bit is needed because there is a 12 x 3 mm neoprene rubber strip to seal the hatch and this needs to be compressed slightly.

 
The lugs on the inside of the hatch are easier to make. Here are a couple of photos showing a lug in position. The black strip is the neoprene sealing strip; again the lugs need to be relieved with a slight slope to accommodate this strip and to compress it slightly.


Finally, a shot showing the lugs holding against the inside face of the bulkhead (but in a test situation).
 
 
All those little wooden pieces, lugs and turn buttons, need to be finished - multiple coats of oil after lots of sanding. No wonder it takes as long as it does!


Friday, 31 January 2014

Onto The Trailer

In between sanding and oiling the decks I have been looking for a trailer. Eventually I bought a new 5 metre trailer from Swiftco. It is built to carry a much heavier boat (950 Kg) than my Able so there is no doubt that it will be strong enough! The springs are too strong for the much lighter boat and my first job was to remove a leaf from each spring.


To get the boat onto the trailer I lifted it up in two slings; the forward one has a block and tackle and the aft one is lifted with an engine crane. Fortunately this arrangement worked very well because I lost count of the number of times I lifted the boat on and off the trailer (and dragged the trailer out of the shed) as I adjusted the rollers and skids to fit. It remains to be seen if the boat launches and retrieves nicely with it set up the way it is now. Here is the boat waiting patiently for the trailer to be put back under it.


Here is a side view of the boat and trailer - only the second time the boat has been out of the shed.


Another side view from slightly forwards.


I stood the mast up with a piece of rope as a forestay. This was necessary to allow the side and forestay lengths to be measured. I will have these wire stays made up by a local chandlery. The mast rake appears greater than actual because the boat is not sitting level on the trailer, look at the waterline.


Here is a photo of the mast hinge. This seems to work OK and the mast is easy enough to raise and lower although a line through a block on the bowsprit is essential to hold it in place while a more permanent fastening is made between forestay and bowsprit for sailing.


Here are a couple of photos of the interior of the boat. The wood work is essentially complete except that I will put a couple of wooden hatches where the cross thwart runs into the side seats to provided access to the storage space underneath.


And finally, when I came to wheel the boat back into the shed, look what happens.


The lower part of the hinged mast is just too high to fit under the shed door. This is quite a problem as my intention was to store the complete boat in this shed in its final "ready to go" configuration with mast, spars and mainsail folded down. At the moment I have 3 solutions: store it elsewhere, build a new shed where the old one is or make a new mast with the hinge lower down. I am very tempted by the new shed because the old one only has 2.1M (7 foot) clearance under the roof trusses; a higher roof would provide more space and make the shed much cooler in the summer months. But it would be expensive! The solution will probably be a combination of store it elsewhere and make a new mast. My longer term plan already included a new mast made with the birdsmouth technique (hollow and much lighter). In the meantime it will be stored elsewhere, undercover but without walls.

Now to continue with the seemingly endless list of jobs and have some sails made.


Decks and Seat Tops Finished

The previous post left the decks and seat tops covered in the black goop (Sikaflex 291). When it had cured for three days I started sanding the excess black goop off. A belt sander with an 80 grit belt made short work of it in the open areas but it is a dangerous tool to use close to the newly painted hull and bulkheads. I found that a paint scraper with a carbide blade worked well to remove the bulk of the black stuff close to the paintwork and could also get into the corners (although care is needed when working across the grain). After the scraper the detail sander with 80 grit paper cleaned up the edges. It sounds straight forward and it was but it took a long day to complete this sanding. Here is a photo of the foredeck after the sanding is complete.

 
Unfortunately after the sanding the imperfections show up where I had failed to fill the gap completely. There were not too many of these and I went round and patched them up. Here is another photo of the foredeck with the patching done. Once patched I had to wait for the caulk to cure before sanding again.

 
Finally I was able to start putting some finish onto the decks; I used Deks Olje. This is a two part finish; the first part is oily and is intended to protect the wood, the second part is more like a varnish and produces a glossy finish. The manufacturers recommend using only the first part on decks to obtain a sealed, protected non-slip surface and that is what I did. It could not be simpler to apply, put on coat after caot, wet on wet, until the surface is still wet after 10 minutes. I applied 7 coats and the then wiped off the excess with a clean rag. After 3 or 4 days the surface is exactly what I wanted.
 
 
I am very pleased with the result. Whether I would do it again is another question. It has been a time consuming and quite expensive exercise but it looks pretty good to me!

Thursday, 16 January 2014

Decking and Seat Tops

Following on from the end of the previous post here is the foredeck with the pavers removed. There is a bit of epoxy squeeze out and I have been removing it with the hot air gun and scrapers. The last two pieces of the margin were glued in place and the straight pieces of decking cut to length and glued down working from the centre outwards. Most of these planks have a curved end and the templates were very handy for marking the curve on the planks. I laid 3 planks at a time working out the spacing by eye; this was probably a mistake, I should have used tile spacers to get the spacing more consistent.


 However, I am pleased with the result. Here is the foredeck with all planks in place. If you double click the image you should get an enlarged view.


Having completed the fore and aft decks I decided to plank the seat tops. This idea had been in my mind but I was hesitant about the larger areas involved. The appearance of the decks convinced me to go ahead with the seats.

The edge of the seats overhangs slightly as shown in Barrett Faneuf's writeup on the Duckworks site. I cut the rebate in these boards on my tablesaw; a bit tricky to set up but much quicker than using the router which is what I did for the edging of the aft deck. With the boards shaped I mitred the corners and glued them in place. The curved margin planks against the hull had to be made in 3 pieces and, once again, I re-used the templates from when I cut the plywood seat tops. The next photo shows the margin planks being glued in place.


From here it was simply a case of cutting the planks to length, shaping the ends where necessary and gluing them down. Because of the longer lengths involved I did these plans 2 at a time working outwards from the centre of the boat. This went quite quickly - shape and glue 2 planks on one side then do the same on the other side. After a couple of hours the epoxy was set enough to hold the planks and another 2 planks could be done. As this process reached the sides I had to slow down a bit because the narrowing space between pavers and hull made access difficult.


Here it is, all planks in place and pavers removed. There is now a lot of sanding to do to clean off the excess epoxy but mainly to level the surface of the planks. I did the bulk of the sanding with a belt sander with 40 grit paper. The corners I did with a detail sander . All this sanding had to be done very carefully to avoid damaging the completed paintwork inside the hull. The 40 grit paper left surface scratches which I cleaned up with 80 grit paper. There's no point trying for the ultimate finish yet as there is more heavy sanding to be done once the caulking is complete.


I made a fairly careful estimate of the length of the caulking and multiplied the length by the average cross section of the gaps. Dividing this total volume by 310 mL (the size of a tube of caulk) came to 8.5 tubes. I bought 10 tubes of Sikaflex 291 and, to avoid another dose of boat building induced RSI in my wrist, I also bought a battery powered caulking gun.


This thing was worth the price. My wrist still works but my back and shoulders ache from bending and operating the device at arms length.

Both Barrett Faneuf and  Joel Bergen taped the planks to keep the black goop under some sort of control - make no mistake, it gets everywhere! I simply gunned the goop into the gap and then trowelled it with a plastic scraper. When it is set I will sand the mess off (I hope).

The next photo shows the caulking about half done. That much caulking took about 2.5 hours and I stopped for a rest overnight!


Another 2.5 hours this morning and it is all done. After 24 hours I will remove the blue masking tape and then wait for the black goop to set. The Sikaflex data sheets suggests that a 6mm thick bead will take 2 days to cure at 23 degrees C and 50% R H. It's hotter and more humid than that here in Brisbane at the moment but I will give it 2 days to be on the safe side.


Tuesday, 31 December 2013

Fore and Aft Decks

I like the idea and appearance of planked decks. Another benefit is that, with an oil finish, they will not be slippery. Some web searching turned up a couple of "how to" guides by builders of John Welsford Navigators. One is Barrett Faneuf's write up and the other is on Joel Bergen's blog. After studying both of these I made a start on the aft deck as it is smaller and an easier shape to deal with. Because I was working by trial and error I didn't take photos until the deck was finished. Here it is.

 
The result looks good to me and so I have made a start on the fore deck. The next photo shows the marking out for the pieces around the mast hole and samson post.

 
Before I cut the plywood deck I made a template from strips of scrap ply stuck together with hot melt glue. Fortunately I kept the side pieces and was able to reuse them to make templates of the margin planks at the sides. Here are the templates on the port side. These planks have to be in two pieces because my planking timber isn't wide enough to fit the curved shape. The joint is in the sunlight above the samson post.
 
 
Having cut all the pieces for the margin and the mitred pieces for the mast hole and samson post surrounds I started gluing them in place. This is a bit tricky because the planks tend to slip about on the epoxy. I'm using pavers to hold the planks down and being very watchful for signs of slippage until the epoxy begins to go off. We are having a run of 30+ degree days at the moment and so this doesn't take too long!
 

There are still two pieces of the side planks to add but, as you can see, the pavers get a bit crowded. Tomorrow I will glue them in and start filling in the space in the middle.


Saturday, 14 December 2013

Back in the Boat Shed

Towards the end of August I went to the UK for 10 weeks. While I was there I managed to meet up with a couple of people who own boats like the one I am building. First was John Sharpe and his SFD Able called Michy Lou for several hours sailing on Lake Ullswater on a cold, wet and windy day.


 Second was Nigel Modern and his SFD Kane (one plank less than Able) called Osprey for a warm sunny afternoon on a reservoir near his home.


I am very grateful to both these guys for the effort they put into taking me for a sail and can't thank them enough. These two days went a long way towards convincing me that I chose a good boat to build; normally you don't get to try the design you choose until you finish building the boat!

I've been home for 6 weeks and it is only in the last few days that I have restarted my Able project. I was jet lagged, I went away visiting friends, I went sailing and then, finally I started sanding the inside of the boat. Today I finished the sanding, taped and protected the areas where I don't want paint and put the first coat of primer on the inside of my boat. The tape and paper is for protection but also to remind me not to get carried away and paint parts that I shouldn't! Here are a couple of photos at the end of the day.


You can see that I am not painting the fore and aft decks and the seat tops. I am going to try and plank these areas. Definitely the decks and maybe the seat tops (if I like the decks).

That's it until I finish the painting. It might be a week or more before I post again because photos and words about paint drying aren't very interesting!